Have you ever looked in the mirror and noticed your skin looking dull, irritated, or just plain unhappy? I know I have. There was a time I felt helpless, trying every lotion and potion on the shelf, only to be disappointed. It wasn’t until I discovered the magic of whipped tallow combined with essential oils that my skin truly started to heal. That lightbulb moment changed everything.
Why Natural Skin Healing Matters Now More Than Ever
With the rise of synthetic skincare products, many of us are turning back to nature for solutions. Organic tallow, especially when whipped and infused with essential oils, offers a rich, nourishing alternative to chemical-laden creams. It’s deeply rooted in traditional skincare but is gaining modern recognition for its remarkable benefits. Recently, experts highlighted that using natural fats like tallow can support skin repair, especially for sensitive or damaged skin. You can read more about this trend in why tallow is trending in clean beauty.
My early mistake? I dismissed tallow altogether, thinking it sounded old-fashioned or greasy. It wasn’t until I learned about the specific qualities of grass-fed, organic tallow that I realized it’s a powerhouse of nutrients. Plus, when whipped into a fluffy consistency and combined with the right essential oils, it becomes a gentle yet effective skin healer. My skin transformation was so noticeable that I now recommend this approach to everyone facing skin struggles.
Have You Faced This Problem?
Are your skin issues making you feel frustrated? Do you want a natural, safe way to soothe irritation, dryness, or signs of aging? If so, keep reading. I’ll guide you through the simple steps of transforming pure tallow into a luxurious, healing balm infused with essential oils. Together, we’ll rediscover an age-old remedy that’s perfect for sensitive and problem skin alike.
Now, let’s dive into how you can craft your own whipped tallow with essential oils and start your journey toward healthier, happier skin.
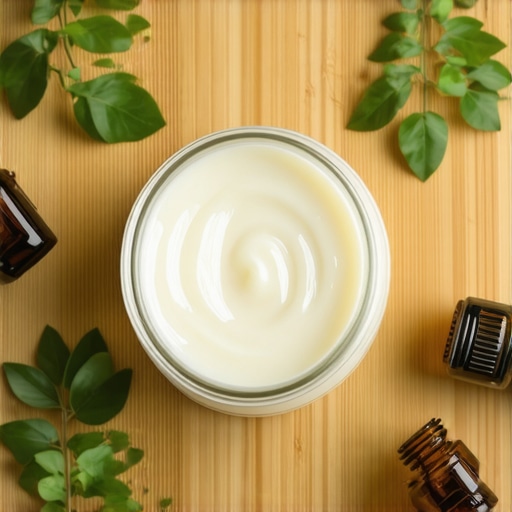
Start with Quality Tallow and Essential Oils
Choose organic, grass-fed tallow for the best skin benefits. I once ordered a jar of tallow online, and the first time I whipped it up, I was surprised by its solid, greasy appearance. It took a few minutes of whipping with a hand mixer until it became fluffy and smooth. Add a few drops of your favorite essential oils—lavender and frankincense work wonders for healing and calming irritated skin. This step is crucial because high-quality ingredients ensure maximum nourishment and healing power.
Properly Prepare Your Tallow for Whipping
Before whipping, melt the tallow gently using a double boiler or microwave in short bursts, avoiding overheating. Pour the melted tallow into a mixing bowl and let it cool slightly until it’s semi-solid but still soft. This makes it easier to whip into a light, airy texture. I remember trying to whip cold tallow straight from the fridge; it was impossible, and the mixture was grainy. Heating it slightly first made all the difference, producing a creamy consistency perfect for application.
Whip to Perfection
Using a hand or stand mixer, whip the softened tallow for 8-10 minutes until it reaches a fluffy, butter-like texture. The process introduces air, making it easier to spread and absorb into your skin. During my first attempt, I was impatient and whipped for only 4 minutes, ending up with a dense paste that felt heavy on my skin. Patience pays off—whipping thoroughly creates a luxurious balm that melts effortlessly and deeply nourishes.
Infuse with Essential Oils for Targeted Benefits
Add your chosen essential oils during the whipping process. Start with 10-15 drops for a small batch; you can adjust for stronger or more subtle scent and benefits. For skin repair and anti-aging, I recommend frankincense and geranium. Incorporate the oils slowly while whipping to distribute evenly. Once mixed, transfer your whipped tallow into clean jars. I store mine in a cool, dark place to preserve its freshness. This infusion process ensures your moisturizer targets your skin’s specific needs—whether healing scars, reducing inflammation, or simply moisturizing.
Apply with Confidence and Consistency
Use your whipped tallow as a daily moisturizer or as a treatment for problem areas. Gently massage a small amount onto clean skin, focusing on dry or irritated patches. I found that applying it right after a warm shower enhanced absorption. For best results, incorporate this into your routine morning and night. The consistency of the whipped tallow makes it easy to spread and prevents clogging pores, unlike some greasy creams. Regular use visibly improves skin texture and resilience over time.
Store Properly for Long-Lasting Freshness
Keep your whipped tallow in airtight containers, away from direct sunlight. Proper storage extends its shelf life and maintains its healing properties. I recommend using small jars and scooping out what you need to avoid contamination. If you notice any discoloration or rancid smell, it’s time to make a fresh batch. Learning how to store your homemade tallow properly is key to enjoying its benefits for months, making it a sustainable part of your skincare routine. For more tips on storage, check out this guide.
Many enthusiasts jump into making whipped tallow without understanding the nuanced truths that separate fact from fiction. One of the most pervasive misconceptions is that all tallow is created equal, leading many to dismiss grass-fed, organic options as unnecessary or overly expensive. In reality, the quality of tallow significantly impacts its effectiveness in skin healing. According to experts in natural skincare, grass-fed tallow contains higher levels of omega-3 fatty acids and conjugated linoleic acid (CLA), which are crucial for skin repair and anti-inflammatory benefits (source).
Another common myth is that whipped tallow is simply a greasy, heavy moisturizer. This belief often stems from using low-quality or improperly prepared tallow. When whipped correctly—using gentle heat and high-quality ingredients—it transforms into a light, fluffy balm that absorbs quickly without clogging pores. The process of aeration during whipping is essential, and skipping this step results in a dense, heavy product that can feel uncomfortable. I’ve seen many beginners make this mistake, but with patience, the texture becomes irresistibly smooth and easy to apply.
Some assume that infused essential oils can harm sensitive skin, but the truth is that when used in proper dilution and quality oils, they enhance healing and provide targeted benefits. For example, frankincense and lavender are renowned for their regenerative properties. However, overdoing it can lead to irritation, especially if your skin is very reactive. It’s wise to start with small amounts, observe your skin’s response, and consult resources like this guide for expert tips.
Can Over-Whipping Damage Your Tallow Balm
Absolutely. Over-whipping can incorporate too much air, making the balm unstable and prone to oxidation. This can reduce its shelf life and diminish its healing properties. It’s best to whip until you reach a creamy, butter-like consistency—usually about 8-10 minutes—then stop. If you notice separation or a grainy texture afterward, it’s a sign you may have whipped too long. Proper storage in cool, dark places also helps maintain its potency. Remember, natural ingredients are sensitive, and careful handling ensures you get the most out of your homemade skincare routine.
In essence, understanding these nuances—like ingredient quality, proper whipping techniques, and cautious use of essential oils—can transform your skincare from a guesswork game into a science-backed routine. Have you ever fallen into this trap? Let me know in the comments and share your experiences!
Maintaining your DIY whipped tallow skincare routine requires more than just high-quality ingredients; it hinges on the right tools and techniques to ensure consistency, efficacy, and longevity. In this article, I’ll share the exact equipment I personally use and recommend to keep your natural skincare products working their magic over time.
Invest in a Good Hand Mixer or Stand Mixer
For whipping your tallow into a fluffy, butter-like consistency, I highly recommend a reliable hand mixer or a sturdy stand mixer. I personally prefer a handheld immersion blender because it offers control and ease of cleaning. The key is to whip the melted tallow for at least 8-10 minutes until it reaches that perfect airy texture. Using a quality mixer ensures you achieve uniform incorporation of air, which is crucial for a light, non-greasy balm that absorbs well. Avoid cheap, underpowered mixers, as they can struggle with thick fats, leading to inconsistent textures.
Utilize Precise Digital Thermometers
Proper temperature control during the melting process is vital. I always use a digital infrared thermometer to monitor the temperature of my tallow. This way, I melt it gently—usually between 37°C to 45°C—avoiding overheating that can degrade nutrients. Precise temperature management preserves the integrity of the fats and oils, ensuring your final product remains potent and effective. This small investment pays off in the long run, especially if you plan to produce batches regularly.
Choose Quality Storage Containers
Storing your whipped tallow in airtight, non-reactive containers is essential for maintaining freshness. I prefer small glass jars with tight-fitting lids because they’re easy to clean and do not leach chemicals into your product. Additionally, I recommend using silicone spatulas for scooping out the balm instead of metal or plastic spoons. This prevents contamination and preserves the product’s purity. Proper storage in a cool, dark place extends shelf life and keeps your skincare effective for months.
Use a Digital Scale for Precise Measurements
When infusing essential oils or creating specific blends, accuracy matters. I use a digital kitchen scale to measure ingredients precisely. This ensures consistency across batches and allows me to replicate successful formulations. Precise measurements also prevent overuse of potent essential oils, reducing the risk of skin irritation. A reliable scale helps you refine your recipes over time, leading to better results.
Predicting the Future of DIY Skincare Tools
As technology advances, I believe smart kitchen devices will soon integrate temperature control and mixing functions, making homemade skincare even easier and more precise. Imagine a device that automatically detects the ideal melting point, whips your fats to perfection, and even dispenses your blend into containers—all at the push of a button. This trend will democratize high-quality natural skincare, empowering more enthusiasts to craft their own products with professional results.
How do I maintain my whipped tallow over time?
Proper storage is key. Keep your whipped tallow in airtight containers, away from sunlight and heat. Regularly check for any signs of rancidity—discoloration, off smells, or grainy texture—and discard if necessary. Using clean utensils and avoiding contamination also extends product life. Incorporating these practices ensures your skincare remains fresh, effective, and safe to use for months on end.
Ready to elevate your skincare routine? Try investing in a high-quality mixer and precise thermometer today. These tools make a noticeable difference in the texture and longevity of your whipped tallow products, helping you enjoy consistent, natural skin benefits every time.
The Hardest Lesson I Learned About Tallow Magic
One of my biggest realizations was that not all tallow is created equal. Initially, I bought a generic jar, whipped it with high hopes, and was disappointed by its greasy feel and short shelf life. It wasn’t until I switched to organic, grass-fed tallow that I truly saw the difference. The quality of ingredients is everything—more omega-3s and CLA mean faster healing and deeper nourishment. This lightbulb moment taught me to always prioritize sourcing the best tallow for skin repair.
My Go-To Tools for Perfect Whipped Tallow
Investing in a reliable hand mixer and a digital thermometer transformed my skincare routine. A sturdy mixer ensures consistent aeration, giving my balm that fluffy, non-greasy texture I love. Meanwhile, precise temperature control preserves nutrients during melting, preventing degradation of essential fats. Trust me, these tools make every batch feel like a professional spa treatment, and they’re worth every penny for the skin benefits they unlock.
Embrace the Journey, Not Just the Results
Creating your own whipped tallow isn’t just about skincare—it’s a ritual of self-care and mindfulness. I’ve learned to be patient during the whipping process, understanding that rushing can lead to a dense, unspreadable balm. When infused with thoughtfully chosen essential oils like frankincense or lavender, it becomes a personalized healing potion. Consistency is key—use it daily, and watch your skin transform from dull and irritated to luminous and resilient.
Curated Gems to Elevate Your Skincare Game
For those wanting to deepen their understanding or streamline their process, I recommend these resources: Why Tallow is Trending in Clean Beauty explains the current craze, while DIY Tallow Cream Recipe offers step-by-step guidance. For sourcing, check out Top Benefits of Organic Tallow with Frankincense to find high-quality options. These curated tools and knowledge will help you craft skincare that’s effective, safe, and truly nourishing.
Your Turn to Try Nature’s Best Kept Secret
Embracing whipped tallow with essential oils can be a game-changer in your skincare routine. It’s more than just a moisturizer—it’s a way to reconnect with ancient beauty rituals that still work today. Don’t hesitate to experiment, learn, and adapt this natural remedy to suit your skin’s unique needs. Your journey toward healthier, more radiant skin starts now.
What’s your biggest challenge when it comes to making or using whipped tallow? Share your experiences below, and let’s grow this community of natural skincare enthusiasts together!