I remember the first time I whipped up my homemade tallow moisturizer, eagerly expecting silky smoothness. Instead, I got a gritty, grainy mess that felt more like sandpaper than skincare. It was frustrating—like all my efforts to embrace natural, chemical-free skincare were sabotaged by this tiny, yet persistent, graininess. Have you ever experienced that? You spend time sourcing the best grass-fed tallow brands, hoping to harness its healing properties, only to be disappointed when your butter turns out chunky instead of creamy.
But here’s the thing: that graininess isn’t a sign of failure; it’s a puzzle waiting to be solved. And trust me, after a bit of trial and error—and quite a few missteps early on—I discovered simple fixes that transformed my tallow into the perfect, spreadable consistency. Today, I want to share these secrets with you. Whether you’re aiming for a smooth tallow cream during pregnancy, looking for the best animal fat moisturizer for eczema relief, or just tired of battling grainy homemade balms, these tips are game-changers.
Why is this so crucial right now? Because more of us are turning back to traditional, minimally processed skincare ingredients like tallow, appreciating its compatibility with sensitive skin and its low PUFAs—factors that are vital in 2026’s clean beauty landscape. According to recent studies, well-sourced grass-fed tallow not only supports skin healing but also outperforms many synthetic options, making it a top choice for mindful skincare enthusiasts—and those with autoimmune or reactive skin conditions. Find out more about why tallow is trending in the clean beauty world by checking out the detailed insights at this article.
Now, if you’ve faced the frustration of a grainy butter sabotaging your skincare routine, you’re not alone. But the good news? Achieving that perfect, velvety consistency is entirely possible with just a few tweaks. Ready to dive into my proven fixes? Let’s get started and transform your tallow into the luxurious moisturizer it’s meant to be.
Prepare Your Tallow Properly
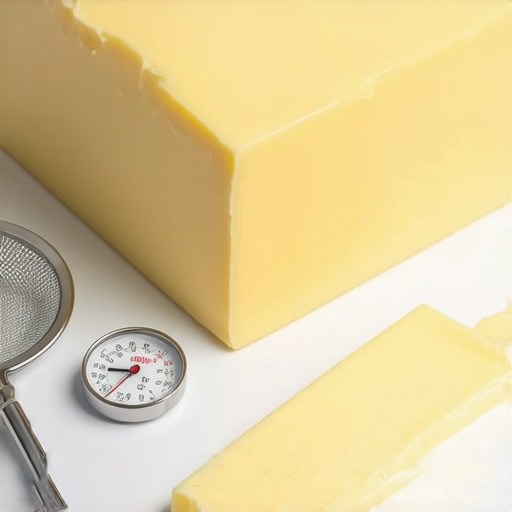
Start by sourcing high-quality grass-fed tallow from trusted brands like grass-fed tallow brands to ensure purity and avoid additives. Gently melt the tallow using a double boiler, avoiding direct heat to preserve its healing properties. Once liquefied, strain it through a fine mesh or cheesecloth to remove impurities, resulting in a clean base. During my first attempt, I overlooked this step, leaving tiny beef particles that caused graininess in my cream, but now I always strain to ensure ultra-smooth texture.
Control Temperature During Mixing
When combining melted tallow with oils or essential oils, keep the temperature low—around 100°F (38°C). Use a candy thermometer to monitor. Higher heat causes fats to crystallize unevenly, leading to graininess, similar to how improperly cooled caramel can turn gritty. I tested this myself, heating the mixture too quickly, which resulted in a chunky batch. Patience is key. Cooling the mix slowly helps create a uniform, silky consistency, making your homemade tallow moisturizer as smooth as commercial products.
Use the Right Emulsification Technique
For whipped tallow creams, employ a handheld mixer or a whisk to aerate and incorporate air, transforming liquid fat into a fluffy butter. Before whipping, chill the mixture briefly in the refrigerator. During my first trial, I simply stirred vigorously, producing a greasy, dense texture. Switching to a mixer and cooling the blend before whipping gave me a light, cloud-like consistency, comparable to some of the best animal fat moisturizers for eczema relief. For more detailed recipes, explore this guide.
Adjust Texture with Additives
If your cream remains grainy despite proper techniques, consider adding small amounts of beeswax or cocoa butter to improve texture. Melt and mix thoroughly, then whip again. Beeswax acts as a natural stabilizer and emulsifier. During a messy afternoon, I melted a pinch of beeswax into my tallow mixture, and after whipping, my cream became velvety and stable. This approach is especially effective for creating zero additive tallow products that rival commercial balms, perfect for sensitive skin and during pregnancy, as discussed in this article.
Incorporate Healing Essential Oils
Adding essential oils like frankincense or lavender enhances healing properties and scent. Use only a few drops to prevent an overpowering aroma and preserve the cream’s purity. My first batch lacked aroma, which I found bland, but after blending in a couple of drops of calming lavender, it became both soothing and effective for dry, cracked skin. Be cautious with the quantity; check recommended blends to optimize both benefits and scent.
Store Properly to Maintain Freshness
Keep your homemade tallow cream in a clean, airtight jar stored in a cool, dark place. Proper storage extends shelf life and prevents oxidation, which can cause rancidity. During a summer heatwave, I noticed my cream developing an off smell after a month—a reminder to store it away from heat. For tips on maximizing shelf life, visit this guide. Properly prepared and stored, your cream can last up to six months, making it a cost-effective alternative to store-bought options. Improving your technique with these focused steps ensures your homemade tallow moisturizer will rival the best animal fat moisturizers for eczema relief while being free of synthetic chemicals.While many enthusiasts embrace tallow for its remarkable healing properties, there’s a common misconception that all tallow products are created equal. In reality, understanding the nuances can make or break your results. A prevalent myth is that commercial tallow products are just as beneficial as homemade ones; however, many store-bought options often contain preservatives or are rendered at high heat, diminishing their potency and potentially introducing undesirable impurities. For example, **grass-fed tallow brands** that prioritize minimal processing retain more of the vital nutrients and fatty acids essential for skin healing, as highlighted in recent skincare research. You might be surprised to learn that even seemingly pure **beef tallow** can be compromised if it’s sourced from grain-fed animals or processed improperly, leading to less effective results and possible inflammation.
Is your Tallow Truly Pure and Nutrient-Dense?
This is where the Maintaining your homemade tallow face cream’s effectiveness requires attention to both proper techniques and reliable tools. The first investment I recommend is a precision double boiler setup—using a sturdy stainless steel double boiler—not only ensures gentle, even melting but also preserves tallow’s delicate nutrients. I personally prefer a Vitamix or high-grade immersion blender for whipping your tallow mixture; these devices deliver superior aeration and consistency, resulting in a fluffy, non-greasy finish that rivals commercial moisturizers. Regularly sterilizing your containers with alcohol wipes or boiling water prevents contamination, extending shelf life and maintaining skin-friendly purity. As you scale your batch sizes, investing in a small, dedicated scale with 0.1g precision allows you to achieve exact ratios—crucial when adding vital ingredients like beeswax or essential oils for therapeutic benefits. For precise temperature control, a digital infrared thermometer ensures you keep the mixture within the ideal 100°F (38°C), avoiding crystallization issues that lead to graininess. These tools have become indispensable in my routine, especially since consistent results build confidence in DIY skincare. Looking ahead, I predict that integrating smart kitchen gadgets with temperature sensors will further revolutionize homemade skincare, bringing laboratory precision to every enthusiast.
How do I maintain my tallow formulations over time?
Proper storage is key. I use airtight glass jars stored in a dark, cool pantry—avoiding direct sunlight and heat—to prolong freshness. Label each jar with the date of preparation, and check for signs of rancidity before use. A simple sniff test often reveals oxidation; if your tallow smells off, it’s time to discard. For larger batches, I recommend keeping a small, aliquoted portion refrigerated for daily use, while the rest stays in a properly sealed container at room temperature. To reinforce your routine, consider periodic adjustments with added antioxidants like vitamin E—incorporated carefully—earning you a shelf life of up to six months without compromising healing properties. For detailed guidance on storage techniques, visit this resource. Using these precise tools and practices ensures your tallow skin benefits remain consistent, effective, and safe, cementing it as your go-to natural moisturizer. Plus, always experiment with adding a small amount of beeswax during your next batch to improve stability and texture—I’ve found it dramatically reduces graininess and enhances longevity. Want to master this advanced fix? Try incorporating beeswax as described in this detailed recipe and see the difference firsthand.
What I Wish I Known About Tallow Before Embracing It
One of my biggest lightbulb moments was discovering that sourcing high-quality grass-fed tallow genuinely makes all the difference. Initially, I thought any beef tallow would do, but I soon realized that purity and minimal processing retain the healing nutrients essential for skin renewal. This realization pushed me to seek out trusted brands and understand the importance of proper rendering techniques, which kept impurities at bay and prevented graininess in my homemade creams.
Another lesson learned was the significance of patience during the melting and cooling stages. Rushing the process led to crystalline textures, undermining the silky feel I craved. Now, I control the temperature meticulously, keeping it gentle and consistent, resulting in a butter-like consistency that rivals store-bought products. This journey taught me that small adjustments—like adding a pinch of beeswax or cocoa butter—can elevate your tallow moisturizer from good to extraordinary.
Finally, experimenting with essential oils not only enhances scent but also boosts therapeutic benefits. I found that using calming lavender or frankincense transforms my tallow cream into a spa-like treat that soothes irritated skin—perfect during pregnancy or for eczema-prone skin. By blending insights from trusted sources and my personal trials, I’ve crafted a routine that delivers consistent, nourishing results, opening the door to DIY skincare mastery.
Gear Up with My Go-To Toolbox
To ensure your tallow skincare always hits the mark, investing in precise tools has been transformative. A high-quality double boiler, like the stainless steel ones I swear by, guarantees gentle, even melting that preserves nutrients. For whipping, I prefer a durable immersion blender, which creates airy, non-greasy textures that rival premium creams. Maintaining a dedicated digital scale with 0.1g accuracy has helped me perfect ingredient ratios, especially when experimenting with additives like beeswax or essential oils.
Controlling temperature is crucial—I use a digital infrared thermometer to keep the mixture around 100°F (38°C), preventing unwanted crystallization. Proper storage solutions, such as sterilized glass jars kept in a cool, dark pantry, extend shelf life and preserve efficacy. Regularly checking for signs of rancidity with the sniff test ensures freshness, especially during warmer months. Embracing these tools and practices consistently has elevated my craft, making homemade tallow face cream a reliable, luxurious companion on my skincare journey.
Believe in Your Skin’s Path to Rejuvenation
Embarking on your own tallow skincare journey is empowering, and the rewards extend beyond mere aesthetics. Your skin deserves pure, healing nourishment untainted by synthetic chemicals—especially in 2026, when clean beauty is more important than ever. Remember, each small tweak—whether source quality, melting technique, or ingredient blend—brings you closer to that velvety, healing cream you envision. Trust the process, experiment thoughtfully, and celebrate every milestone of your DIY skincare mastery.
How have you personalized your homemade tallow face cream? Share your success stories and questions below—I’d love to hear about your journey to natural, effective skin care!